How to configure automatic internal linking without crashing your WordPress database
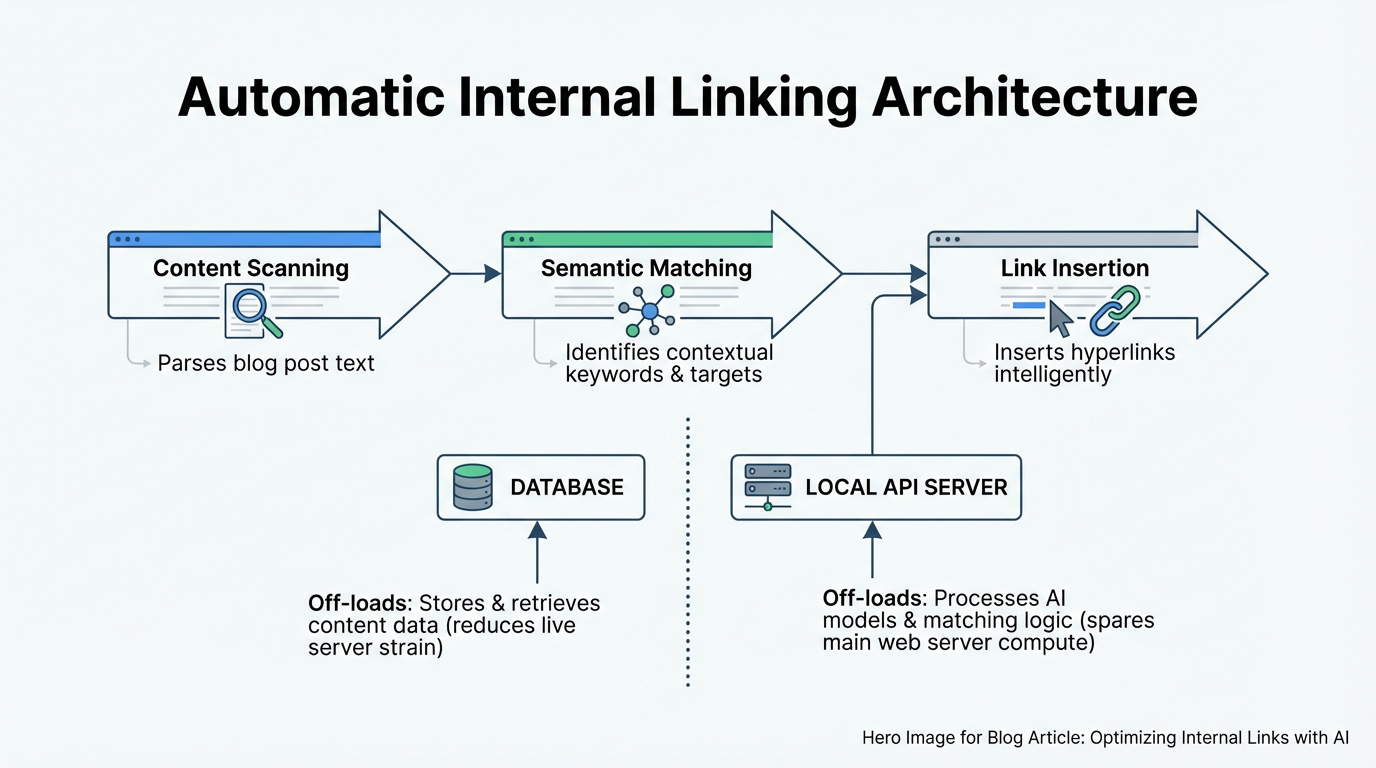
Automatic internal linking is software that detects contextually relevant relationships between pages and inserts links without manual intervention, using either keyword string-matching or semantic vector analysis to decide which pages to connect.
The appeal is obvious: WordPress sites with 500+ posts can spend hundreds of hours manually linking content. But most site owners skip the technical setup and activate automation with default settings, and their database suffers. The results are database bloat, CPU overload on page loads, and anchor text over-optimization penalties.
This guide covers the performance costs of different automation architectures, shows exactly how to configure safeguards against link-bombing, and explains which deployment model scales without crushing your server.
What automatic internal linking is and how it works
The key distinction in any automation tool is whether it relies on keyword string-matching or semantic vector analysis to decide which pages to connect.
Traditional WordPress plugins like Internal Link Juicer use rules-based keyword replacement: the tool scans every post for target keywords and places links to matching pages. This approach is fast but rigid. It frequently creates links to topically unrelated content because "apple" on a food blog might match a tech article with "apple" in it.
Modern semantic tools analyze the actual meaning of page content using embedding vectors or LLM analysis. A post about "cultivating soil health" correctly links to a post about "crop rotation," even if the exact words never appear on either page. The trade-off is computational cost: semantic analysis requires either cloud processing or local GPU cycles.
The practical difference at scale is significant. Rules-based tools require you to manage keyword lists manually and still produce mismatches as your content library grows. Semantic tools require more setup upfront but need less ongoing correction.
The database and server load cost of automation plugins
Every automation approach carries a hidden performance cost. Understanding the architecture of each approach helps you prevent site slowdown as you scale to hundreds or thousands of posts.
Rules-based keyword replacement plugins scan post content on page save and insert links directly into post_content. Database cost: one INSERT or UPDATE query per new link, multiplied by every post you automate. On a site with 5,000 posts and an average of 3 auto-links per post, that is 15,000 link insertions stored in post_content. The issue compounds if you re-run automation: every update query risks bloating post_content further, and a post that starts at a reasonable size can grow substantially after multiple automation runs.
PHP DOM scanning plugins are worse. They run link analysis on every page load by parsing post_content into a DOM tree, checking for keyword matches, and dynamically injecting links into the HTML before the page renders. This is invisible to site visitors but expensive for WordPress: each page load triggers post_content queries plus DOM parsing, which consumes CPU cycles. On a high-traffic site, this compounds to thousands of operations per day, and server CPU spikes become visible in your hosting dashboard.
REST API-based local processing avoids both problems. A desktop app or local service analyzes your content and makes batched API calls to insert links, storing changes directly in the database outside page load cycles. No runtime overhead on frontend page loads.
Here is a comparison of the three approaches:
| Approach | Query volume per update | Front-end page load cost | Database bloat risk | Scalability |
|---|---|---|---|---|
| Rules-based (on-save) | High (1 per link) | None | High (post_content) | Limited to site capacity |
| DOM scanning (on-load) | Medium (cached queries) | High (CPU per render) | Medium | Low (CPU bottleneck) |
| REST API local processing | Low (batched) | None | Low | High (off-site processing) |
The practical implication: a large eCommerce site using a PHP DOM plugin can see measurable page load degradation when link injection overlaps with high traffic, because the CPU cost of DOM parsing stacks directly on top of your existing render time. REST API batch processing removes that overhead entirely by running outside the request cycle.
How to set up automated internal controls to prevent link-bombing
Link-bombing happens when automation tools generate too many links or create anchor text that looks like keyword stuffing. Google's core updates routinely penalize exact-match anchor text clustering and excessive internal linking. Here is how to configure safeguards.
Set post-level link limits. Limit automatic links to a maximum of 3 per post. This prevents the algorithm from linking every mention of a target keyword. If you have a 2,000-word post about "WordPress performance," limiting auto-links to 3 means the tool links only the most contextually relevant instances. Look for settings labeled "Max links per post" or "Links per keyword" in your tool's configuration panel.
Implement anchor text variation rules. Track the anchor text your automation generates and enforce quotas on exact-match text. If your target keyword is "WordPress hosting," your automation should generate different anchor variations across the site:
- Exact match ("WordPress hosting"): no more than 40 percent of links pointing to that target
- Partial match ("managed hosting", "WordPress"): no more than 30 percent each
- Natural or branded text (page title, "this guide"): the remainder
This prevents repetitive anchor patterns that trigger over-optimization penalties. Check your automation tool's documentation for anchor text templating options; most serious tools include some form of variation control.
Configure keyword and topic silos. If you run multiple content silos (a "WordPress" section, an "SEO" section, an "eCommerce" section), configure your automation to link within silos first. This keeps authority concentrated and user journeys coherent. A post in the "WordPress performance" cluster should auto-link to other posts in the same cluster, not to eCommerce guides. Most REST API tools support taxonomy-based link targets, making silo enforcement straightforward.
Set cooldown periods. Do not automate all existing content on day one. Start with a small batch of recent posts, audit the links over two to three weeks, then expand to older content. This gives you time to catch configuration errors before they propagate to your entire site. The specific batch size is less important than the principle: verify first, then scale.
Impact of automated silos on user dwell time
Siloing is a content architecture strategy where related posts link tightly together, creating a topical loop. When automated linking respects silos, users who land on one post stay longer because the next suggested link is always relevant.
Consider a food blog with three silos: "Bread," "Pasta," and "Fermentation." If automation is configured to link only within silos, a user landing on "Sourdough maintenance" will see internal links to "Starter cultures," "Hydration ratios," and "Fermentation troubleshooting," all within the Bread and Fermentation cluster. If automation ignores silos and generates cross-silo links, the same user might land on "Fresh pasta techniques," which breaks their reading path.
Silo-aware automation increases contextual relevance in a measurable way. When links stay within a topical cluster, the next destination is directly relevant to what the reader already chose to read. They are more likely to click through, and when they do, they tend to stay on that second page longer because it answers a follow-up question rather than introducing an unrelated topic.
To implement: configure your automation tool to respect WordPress category or tag hierarchies. Most modern tools allow you to define "allowed link targets" by category or custom taxonomy. The setup typically takes under 15 minutes and produces a noticeable improvement in engagement signals, according to research from koanthic.com.
Deployment options for high-volume content operations
For sites managing hundreds or thousands of posts, the deployment model matters as much as the automation logic itself.
Traditional WordPress plugin. Install on your site, run automation from the WordPress admin interface. Simple setup with no external dependencies. Automation runs on your server, which blocks admin operations during bulk runs and slows down significantly for large sites. Best suited for sites under 1,000 posts.
Cloud-based API tool with batch operations. Upload your sitemap; the service analyzes your content remotely and returns link suggestions or deployments via REST API. No server load during analysis, parallel processing, and full audit trails. The trade-off: your content leaves your server (a real concern for client work), and you pay a monthly subscription. Best suited for teams that need external audit trails and oversight.
Local desktop app with REST API deployment. Download a desktop application, connect it to your WordPress site via Application Passwords or an API key, run analysis locally on your machine, and deploy approved links via REST API. Zero data upload, no recurring subscription, and complete control over which links deploy. Rollback is instant because link changes are stored separately from post content. The main constraint: large crawls require a machine dedicated to the task for the duration. Best suited for agencies managing multiple sites or environments where client data cannot leave the local network.
WPLink uses this local processing model, running semantic analysis entirely on your machine with support for OpenAI, Anthropic, or local AI models, then deploying approved links to WordPress via REST API. For a typical agency managing 10 or more client sites, this eliminates data upload concerns and removes the SaaS subscription overhead that accumulates across accounts.
For solo content creators with under 50 posts, a standard WordPress plugin is simpler and more than adequate. The deployment choice only becomes consequential when the site is large enough that performance, data privacy, or cross-site management creates real friction.
Frequently asked questions
How do I know if my database is being bloated by automation?
Check your post_content field sizes in phpMyAdmin. If posts are running significantly larger than you would expect given their content length, you may have stored link accumulation from repeated automation runs. Also watch the postmeta table: if it grows disproportionately large relative to your post count, your plugin may be logging excessive metadata per link operation. Switching to a tool that deploys via REST API rather than storing everything in postmeta typically resolves both issues, as detailed in this technical guide.
Can I use exact-match anchor text if my automation generates it in small quantities?
Yes, but only with variation across the site. If you have many links pointing to the same target page and a large proportion use identical anchor text, that pattern becomes a flag. Aim for no more than 40 percent exact-match for any single target page across your entire site. Track this using your tool's link report or a spreadsheet export; the ratio matters more than the absolute count.
Should I use semantic AI or keyword-based automation?
Use semantic analysis if you have 500 or more posts and want to scale without continuous manual review. Use keyword-based rules if you have under 200 posts and can afford to spot-check links regularly. Keyword-based tools are faster to configure but generate links to topically unrelated content as your library grows; semantic tools require more initial setup but stay contextually accurate at scale, as RankMath explains.
How often should I audit automated links?
For high-volume operations, run a full audit after each major automation batch. For smaller sites, monthly spot-checks of a representative sample of links usually suffice. The goal of each audit is the same: verify links read naturally in context, check for unusual patterns like multiple links from one post to the same target, and flag excessive exact-match anchor text. Most tools include a link report that makes this faster than reviewing posts manually.
Can I automate internal linking on an eCommerce site without risking penalties?
Yes, with the right configuration. Limit auto-links to product descriptions and blog content rather than product title text, which can create false keyword relevance. Respect product silos: link similar products together and link blog posts to product pages only when the content is genuinely related. Avoid linking every product mention to a product page just because it matches a keyword target; frequency and relevance both matter.
What happens if I run automation on my whole site at once?
On a large site, running full automation in a single batch creates several problems. The database write volume can spike, slowing down the site for visitors during the run. Configuration errors propagate to thousands of posts before you catch them. And if the tool generates poor links, rolling back across thousands of posts is time-consuming. Starting with a small batch, auditing results, then expanding in controlled stages avoids all three of these outcomes.
Related Reading
- How to automate internal links – Step-by-step guide to configuring automation without performance penalties.
- Internal linking for SEO – Best practices for anchor text and link distribution.
- Internal linking automation glossary – Key terms and concepts for automation tools.